

Paystack Payment Provider
This guide provides step-by-step instructions for integrating Paystack with your MicroPowerManager (MPM) project to accept online payments from customers for meter tokens and solar home system (SHS) services.
With Paystack enabled, MPM generates a public payment URL that you can share with customers. Customers visit the link, select their device, enter an amount, and pay via Paystack — the transaction is automatically recorded in MPM.
Overview
Pre-requisites
- Access to the MPM admin panel
- A Paystack account (a free test account is sufficient for initial setup)
- Your Paystack Secret Key and Public Key from Settings → API Keys & Webhooks in the Paystack Dashboard
Integration
- Enable the
Paystack Payment Providerplugin in MPM - Enter your API keys and merchant details on the overview page
- (Optional) Mirror the auto-generated callback URL in your Paystack dashboard for redundancy
- Share the generated payment URL with your customers
INFO
You can start with Paystack Test credentials to verify the integration before switching to Live keys for production.
Detailed Setup
Step 1: Create a Paystack Account
- Visit Paystack Signup
- Fill in your business details and verify your email
- Complete the onboarding steps in the Paystack dashboard
Step 2: Get Your API Keys
- Log into your Paystack Dashboard
- Navigate to Settings → API Keys & Webhooks
- Copy your Secret Key and Public Key
- Use Test keys while setting up; switch to Live keys when ready for production
WARNING
Keep your Secret Key confidential. Never share it publicly or commit it to version control.
Step 3: Enable the Paystack Plugin in MPM
- Log into your MPM admin panel
- Navigate to the Plugin page
- Find Paystack Payment Provider in the available plugins list
- Click Enable to activate the plugin
- The setup wizard will appear — you can configure credentials now or skip and do it later from the overview page
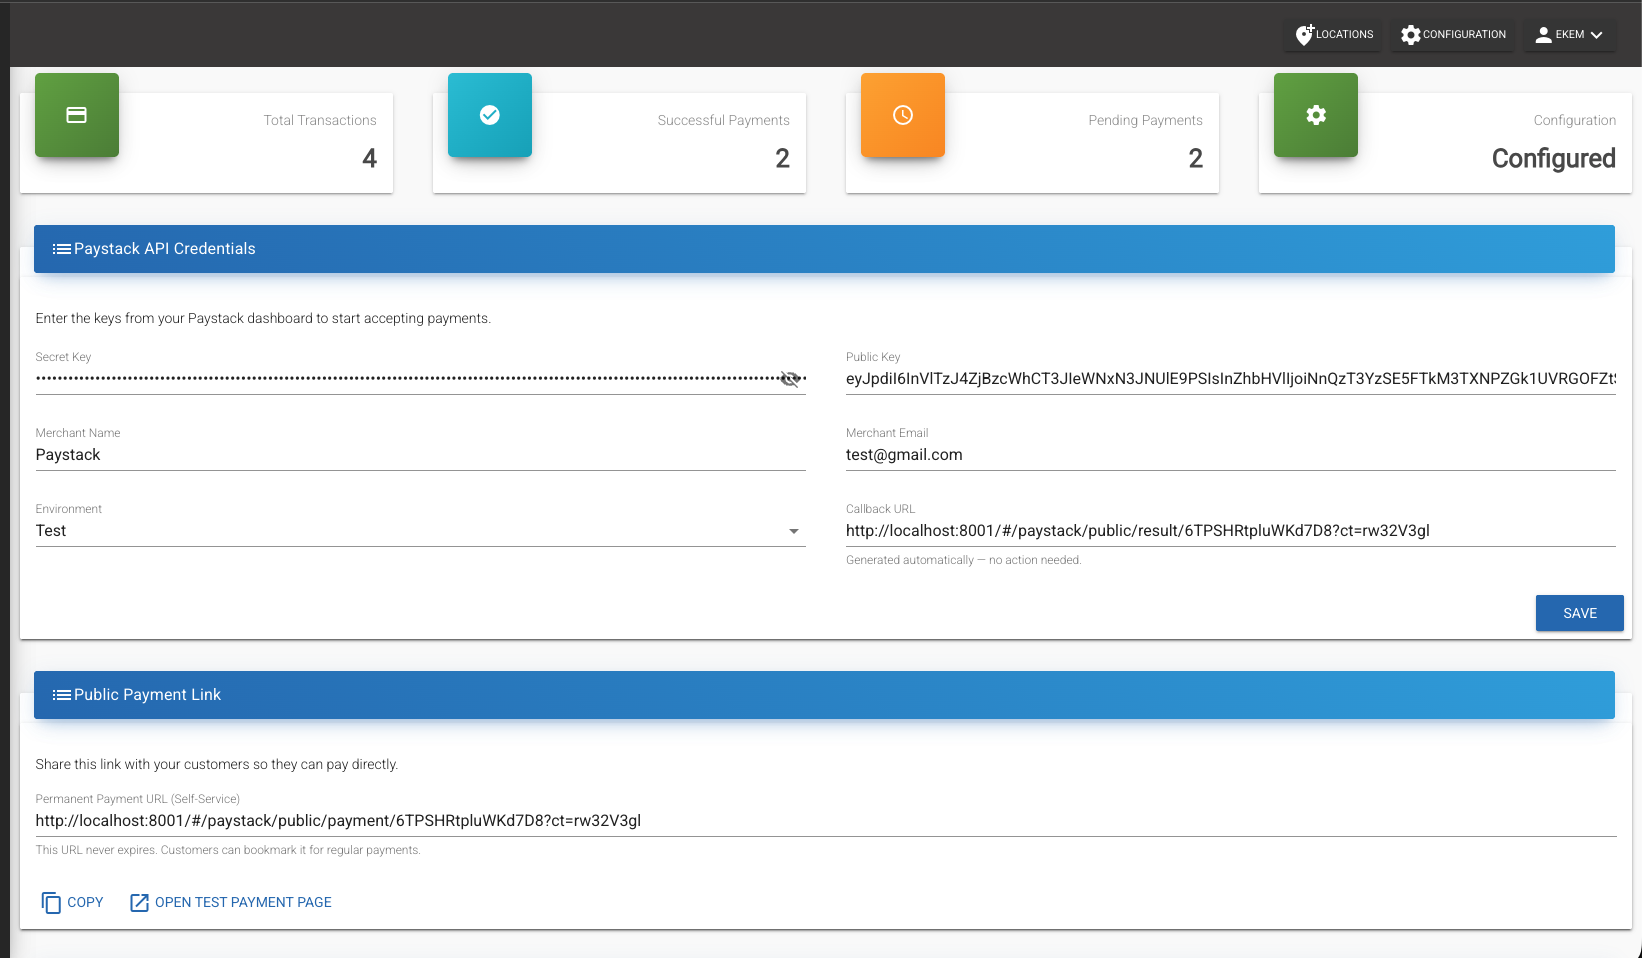
Step 4: Configure Credentials
- Navigate to Paystack → Overview in the MPM sidebar
- Fill in the credential form:
- Secret Key — your Paystack secret key from Step 2
- Public Key — your Paystack public key from Step 2
- Merchant Name — your business or mini-grid name
- Merchant Email — the email associated with your Paystack account
- Environment — select
Testfor testing orLivefor production - Callback URL — read-only and auto-generated; MPM derives it from the public payment URL, so you don't need to fill or copy anything by hand
- Click Save
- The Configuration status box at the top should turn green and show "Configured"
Step 5: Mirror the Callback URL in Paystack
MPM passes the callback URL with every transaction it initialises with Paystack, so customers are redirected to the MPM result page out of the box — no manual configuration is required. Setting the same URL in the Paystack dashboard is purely a dashboard-level fallback.
- In the MPM Paystack overview page, copy the value from the auto-generated Callback URL field on the credentials form
- Go to your Paystack Dashboard → Settings → API Keys & Webhooks
- Paste the URL into the Callback URL field
- Save your settings
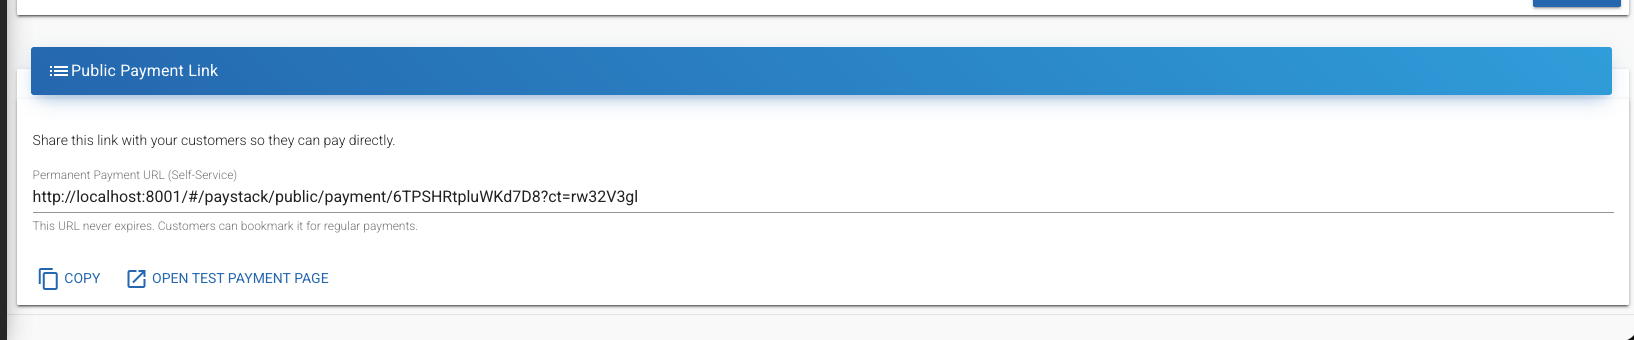
Step 6: Share the Payment URL with Customers
- In the MPM Paystack overview page, find the Public Payment Link card and copy the Permanent Payment URL
- Share this URL with your customers through:
- SMS messages
- Printed QR codes at your office
- WhatsApp or other messaging apps
- Your website or customer portal
When customers visit the payment URL, they will:
- Select their device type (Meter or Solar Home System)
- Enter their device serial number (validated against your MPM records)
- Enter the payment amount
- Complete payment through Paystack's secure checkout
- See a confirmation page with their transaction status
Step 7: Test a Payment
Before going live, verify the integration works end-to-end:
- Ensure your environment is set to Test in MPM credentials
- On the Paystack overview page, click Test Payment Page to open the public payment form
- Select a device type and enter a valid serial number from your MPM system
- Enter a test amount and submit
- Complete the payment using Paystack's test card details
- After payment, you should be redirected to the result page showing the transaction status
- Back in MPM, navigate to Paystack → Transactions to verify the transaction was recorded
Monitoring Transactions
The Paystack overview page in MPM shows:
- Total Transactions — all payment attempts
- Successful Payments — completed and verified transactions
- Pending Payments — transactions awaiting verification
- Configuration — current credential status
For detailed transaction history, navigate to Paystack → Transactions to view, filter, and inspect individual payment records.
Troubleshooting
Payment form shows "Invalid device serial number":
- Verify the serial number exists in your MPM system under the correct device type (Meter or SHS)
- Check that the device is registered and active
Customer not redirected after payment:
- Ensure your MPM instance is publicly accessible (not just on localhost) so Paystack can reach the auto-generated callback URL
- If you also configured a fallback callback URL in the Paystack dashboard (Step 5), confirm it matches the value in MPM's credentials form
Transaction not appearing in MPM:
- Check that your API keys match between MPM and Paystack dashboard
- Verify the environment setting (Test vs Live) matches the keys you're using
- Check MPM logs for webhook processing errors
"Failed to generate public URLs" error:
- Save your credentials first — URLs can only be generated after credentials are configured
- Refresh the page and try again
Authentication errors:
- Double-check that you copied the full API keys without extra spaces
- Ensure you're using the correct key pair (Test keys for test environment, Live keys for live)
Production Considerations
When moving from test to production:
- Switch your API keys to Live keys in both MPM and Paystack dashboard
- Change the environment setting to Live in MPM credentials
- The callback URL re-derives itself from your production domain on save — no manual edit needed; if you also set a dashboard-level fallback, update it to match
- Test a real payment with a small amount to confirm everything works
- Monitor the first few transactions in both MPM and Paystack dashboards
- Ensure your MPM instance uses HTTPS — Paystack requires secure connections for live payments