

Flutterwave Payment Provider
This guide provides step-by-step instructions for integrating Flutterwave with your MicroPowerManager (MPM) project to accept online payments from customers for meter tokens and solar home system (SHS) services.
With Flutterwave enabled, MPM generates a public payment URL that you can share with customers. Customers visit the link, select their device, enter an amount, and pay via Flutterwave's hosted checkout — the transaction is automatically recorded in MPM.
Overview
Pre-requisites
- Access to the MPM admin panel
- A Flutterwave merchant account (the sandbox/test mode is sufficient for initial setup)
- Your Flutterwave Public Key, Secret Key, and Encryption Key from Settings → API in the Flutterwave Dashboard
- A Secret Hash — a value you choose yourself and set in both MPM and your Flutterwave dashboard (details in Step 4)
Integration
- Enable the
Flutterwave Payment Providerplugin in MPM - Enter your API keys, a Secret Hash of your choosing, and merchant details on the overview page
- Register MPM's webhook URL and the same Secret Hash in your Flutterwave dashboard — this step is manual, unlike some other providers
- Share the generated payment URL with your customers
INFO
You can start with Flutterwave Test credentials to verify the integration before switching to Live keys for production.
WARNING
Flutterwave does not sign webhooks with your Secret Key. It echoes back whatever Secret Hash you configure in Settings → Webhooks on their dashboard, and MPM checks that it matches what you entered in Step 4 below. If you skip setting the Secret Hash on Flutterwave's side, Flutterwave sends webhook notifications with no verification header at all, and MPM will reject every one of them — payments will appear successful to the customer but never get confirmed in MPM.
Detailed Setup
Step 1: Create a Flutterwave Account
- Visit Flutterwave Signup
- Fill in your business details and verify your email
- Complete the onboarding steps in the Flutterwave dashboard
Step 2: Get Your API Keys
- Log into your Flutterwave dashboard
- Navigate to Settings → API keys
- Copy your Public Key, Secret Key, and Encryption Key
- Use the Test key set while setting up; switch to Live keys when ready for production
WARNING
Keep your Secret Key and Encryption Key confidential. Never share them publicly or commit them to version control.
Step 3: Enable the Flutterwave Plugin in MPM
- Log into your MPM admin panel
- Navigate to the Plugin page
- Find Flutterwave Payment Provider in the available plugins list
- Click Enable to activate the plugin
- The setup wizard will appear — you can configure credentials now or skip and do it later from the overview page
Step 4: Configure Credentials
- Navigate to Flutterwave → Overview in the MPM sidebar
- Fill in the credential form:
- Public Key — your Flutterwave public key from Step 2
- Secret Key — your Flutterwave secret key from Step 2
- Encryption Key — your Flutterwave encryption key from Step 2
- Webhook Secret Hash — pick any secret string yourself; this isn't provided by Flutterwave, you choose it. You'll set this exact same value on Flutterwave's side in Step 5.
- Merchant Name — your business or mini-grid name
- Merchant Email — the email associated with your Flutterwave account
- Environment — select
Testfor the sandbox orLivefor production - Callback URL — read-only and auto-generated; MPM derives it from the public payment URL, so you don't need to fill or copy anything by hand
- Click Save
- The Configuration status box at the top should turn green and show "Configured" once all four keys are set.
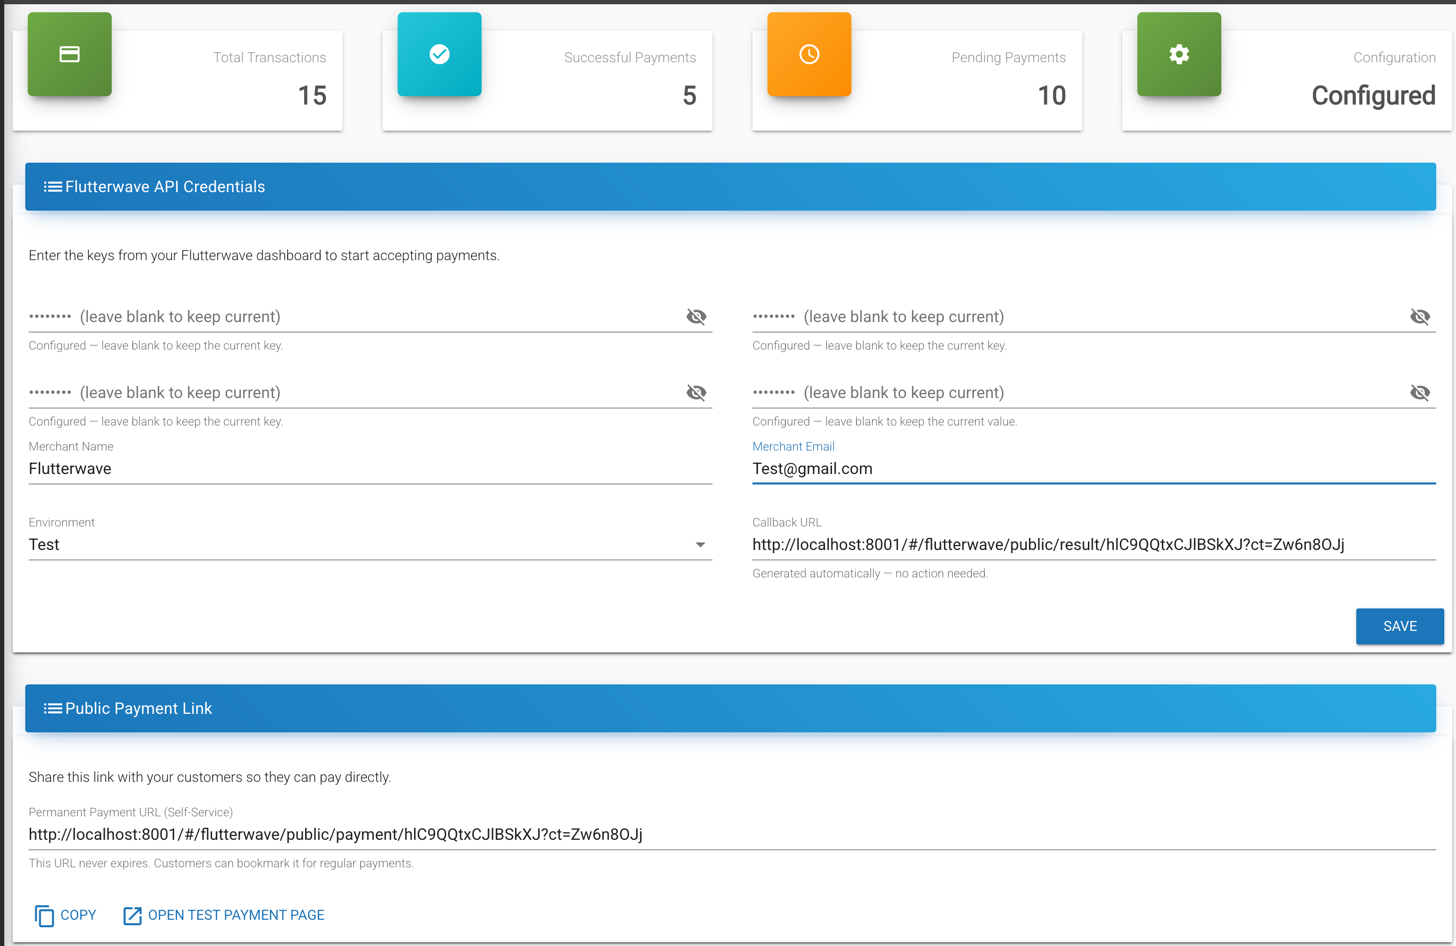
Every one of these four fields is write-only: once saved, MPM never displays the stored value back to you (even in encrypted form) — the field simply shows a "Configured" note and stays blank. To change a key later, type the new value; leaving a field blank on save always means "keep what's already stored," so you never need to re-enter keys you aren't changing.
Step 5: Register the Webhook in Flutterwave
Unlike some providers, Flutterwave requires you to register the webhook URL and Secret Hash by hand — there is no automatic registration call.
- In MPM, on the Flutterwave → Overview page, find the Flutterwave Webhook Link card and copy the Webhook URL
- Log into your Flutterwave dashboard and navigate to Settings → Webhooks
- Paste MPM's webhook URL into the Webhook URL field for the environment you're using (Test or Live)
- Set the Secret Hash field to the exact same value you entered as "Webhook Secret Hash" in Step 4 — a mismatch here means every webhook will be silently rejected
- Save the webhook settings on Flutterwave's side

INFO
Flutterwave's sandbox servers need your MPM instance to be reachable from the public internet. If you're testing locally, expose your backend with a tunnel (e.g. ngrok http 8000) and use the tunnel's public URL as the webhook URL for this step — a bare localhost address will never receive a webhook call.
Step 6: Share the Payment URL with Customers
- In the MPM Flutterwave overview page, find the Public Payment Link card and copy the Permanent Payment URL
- Share this URL with your customers through:
- SMS messages
- Printed QR codes at your office
- WhatsApp or other messaging apps
- Your website or customer portal
When customers visit the payment URL, they will:
- Select their device type (Meter or Solar Home System)
- Enter their device serial number (validated against your MPM records as they type)
- Enter the payment amount and select a currency
- Complete payment through Flutterwave's secure hosted checkout
- See a confirmation page with their transaction status
Step 7: Test a Payment
Before going live, verify the integration works end-to-end:
- Ensure your environment is set to Test in MPM credentials, and that the Test webhook is configured on Flutterwave's side (Step 5)
- On the Flutterwave overview page, click Open test payment page to open the public payment form
- Select a device type and enter a valid serial number from your MPM system
- Enter a test amount and submit
- Complete the payment using Flutterwave's test card details
- After payment, you'll be redirected to a result page — this page displays a live status check against Flutterwave, but the transaction is only actually marked complete in MPM once the webhook from Step 5 arrives, typically within a few seconds
- Back in MPM, navigate to Flutterwave → Transactions to verify the transaction shows as Success, with an external transaction id populated
How It Works
Flutterwave's v3 REST API drives the payment flow, and the redirect and the webhook are two independent paths:
- Initiate — MPM calls
POST /v3/paymentswith the amount and a reference it generates. Flutterwave returns a hosted checkoutlink. - Customer Pays — the customer's browser is redirected to that link and completes payment on Flutterwave's hosted page.
- Redirect (display only) — Flutterwave redirects the customer back to MPM's result page with a reference and Flutterwave's own transaction id. MPM calls
GET /v3/transactions/{id}/verifyto show the customer a live status, but this call does not update the transaction record — it's purely for what the customer sees on screen. - Webhook (authoritative) — separately, Flutterwave's servers call MPM's webhook URL with the payment result. MPM verifies the request by comparing Flutterwave's
verif-hashheader against your configured Secret Hash, then updates the transaction and triggers token generation. This is the only path that actually completes a payment in MPM — if it never arrives (unregistered webhook, Secret Hash mismatch, MPM unreachable from the internet), the customer sees a success screen but the transaction stays at "Requested" indefinitely.
Monitoring Transactions
The Flutterwave overview page in MPM shows:
- Total Transactions — all payment attempts
- Successful Payments — completed and verified transactions
- Pending Payments — transactions awaiting webhook confirmation
- Configuration — whether all four credential fields are set
For detailed transaction history, navigate to Flutterwave → Transactions to view, filter, and inspect individual payment records.
Troubleshooting
Payment form shows "Invalid device serial number":
- Verify the serial number exists in your MPM system under the correct device type (Meter or SHS)
- Check that the device is registered and active
Transaction stays at "Requested" even though the customer says they paid:
- This is almost always a webhook problem, not a payment problem — check Step 5 was completed on Flutterwave's side
- Confirm the Secret Hash in Flutterwave's dashboard exactly matches the Webhook Secret Hash saved in MPM (retype both if unsure — there's no way to compare the stored value directly, since it's write-only)
- Confirm the Webhook URL registered in Flutterwave points at a publicly reachable address for your MPM instance
- Check MPM logs for webhook activity (
docker compose logs -f backend-dev) — a rejected webhook logs as a401response
Customer sees "Success" on the result page, but nothing changes in MPM:
- This is the redirect-vs-webhook split described in "How It Works" above — the result page's status check doesn't write to MPM. Fix the webhook, not the redirect.
Saving credentials fails with a validation error:
Callback URL,Merchant Name,Merchant Email, andEnvironmentare always required- The four key fields are optional on each save (blank means "keep the current value"), but all four must have been set at least once before the plugin is usable
Authentication errors when initiating a payment:
- Double-check that you copied the full keys without extra spaces
- Test keys only work with
Environment: Test, and live keys only work withEnvironment: Live
Production Considerations
When moving from test to production:
- Switch your keys to Live in both MPM and the Flutterwave dashboard
- Change the environment setting to Live in MPM credentials
- Repeat Step 5 for the Live environment specifically — Flutterwave's Test and Live webhook settings are configured separately, so a webhook and Secret Hash registered only for Test won't carry over
- Test a real payment with a small amount to confirm everything works
- Monitor the first few transactions in both MPM and the Flutterwave dashboard
- Ensure your MPM instance uses HTTPS — Flutterwave requires secure connections for live payments and webhooks