Setup a development environment
This document will guide you on how to setup a local development environment of MicroPowerManager (MPM).
In a local development environment
- the backend is served under http://localhost:8000
- the frontend is served under http://localhost:8001
Preamble
This guide requires a Unix-like environment. Supported platforms include:
- macOS: Any recent version of macOS (13 Ventura or later)
- various Linux distributions (Ubuntu, Fedora, Debian)
- Windows with Windows Subsystem for Linux 2 (WSL2)
For Windows users:
- Please ensure you have WSL2 installed and properly configured before proceeding.
- Please ensure you are running Docker Desktop in WSL2 mode.
- When opening the repository in VS Code ensure to open in WSL2 mode (for example by navigating to the source code in WSL2 terminal and running
code .)
For all users:
This document assumes that you have a basic understanding of how to use the command line. You should be familiar with common Unix commands such as cd, ls, mkdir, and how to edit text files using a text editor like VS Code. Before proceeding, ensure you can open a terminal (Terminal app on macOS, terminal emulator on Linux, or WSL2 terminal on Windows) and run basic commands.
Pre-requisites
- A docker container runtime with Docker Compose (for example Docker Desktop). Make sure to configure at least 4GB of memory and 50GB disk (more doesn't hurt either) to the Docker Virtual Machine (VM).
- Working installation of git
- A Text editor (While you can use any text editor you're comfortable with, we recommend VS Code for this project)
Installation
git-clone the repository- Build and run the Docker containers with
docker compose up - To access the local development instance of MicroPowerManager open http://localhost:8001/ in a web browser.
Seeding the database
When you run the application in development mode for the first time, it will automatically seed the database with demo data. This demo data tries to mimic a real-world use-case and is generally helpful when exploring MicroPowerManager's functionality or feature development.
INFO
This behaviour is controlled by the environment variable MPM_LOAD_DEMO_DATA, see here.
If you wish to explore a vanilla MicroPowerManager instance where you can register new users and tenants from scratch, set MPM_LOAD_DEMO_DATA to false.
However, for a better development flow it is generally recommended to seed the local development environment with demo data.
Log in to the application using the following credentials:
username: demo_company_admin@example.com
password: 123123
The seeded admin account holds the Owner role, so it can access every page secured by RBAC.
Running artisan commands
When working with Laravel it can be helpful to have access to Laravel's CLI tool Artisan.
To access artisan in MicroPowerManager development environment, run
docker exec -it -u www-data backend-dev bash
php artisan --help
Reseting the Demo data
WARNING
Resetting the Demo data will remove all data from the Demo tenant. Any changes to the Demo data (for example created users, cluster or appliances) will be lost.
If you wish reset the Demo data setup to the default setup, run:
docker exec -it -u www-data backend-dev bash
php artisan migrate-tenant:drop-demo-company
php artisan migrate:fresh --seed
This can be helpful if
- Your sample setup got very messy and you wish to have a clean data basis for your work
- New Demo data seeders got added in the upstream code base and you wish to run them
Advanced development environment
The above instructions describe how to set up a simple local environment of MicroPowerManager. This is great for exploring the project both by interacting with the app and potentially some smaller code changes.
However, if you are considering to contribute to MicroPowerManager code base it is recommended to set up some additional steps and tools for developer's convienience.
We describe an example set up that has proven to work well based on VS Code. Configurations for a different editor will work a like.
Local PHP installation
For local development and editor integration it can be helpful to have a local instance of PHP. This will allow you to run composer scripts like larastan without the need to use Docker. Also, a local PHP installation is pre-requisite for MicroPowerManager plugin development.
Install the following tools
The actual steps for installation are highly dependant on your system setup. Please refer to the individual tools documentation.
For example using brew on MacOS
brew install php@8.2
brew install composer
pecl install redis
Alternatively Laravel Herd can be used.
Access Docker MySQL database locally
Certain PHP tools (such as migration or seeding utilities) work more conveniently when they can connect directly to the database from your local environment, rather than from inside a Docker container.
To enable this, you can access the Docker-managed MySQL database locally. The Docker Compose stack must still be running, but this setup allows you to run PHP commands from your local terminal, providing a smoother development experience.
- Install direnv
- Copy
.envrc.sampleto.envrc(and adapt it's values if you run with non-default configuration) - Run
direnv allow
Linter configuration
The project uses various linters to ensure a consitent code base across the project. The exact linter configuration can be found here: .github/worksflows.
Install the following linter and auto-formatter extensions
API client
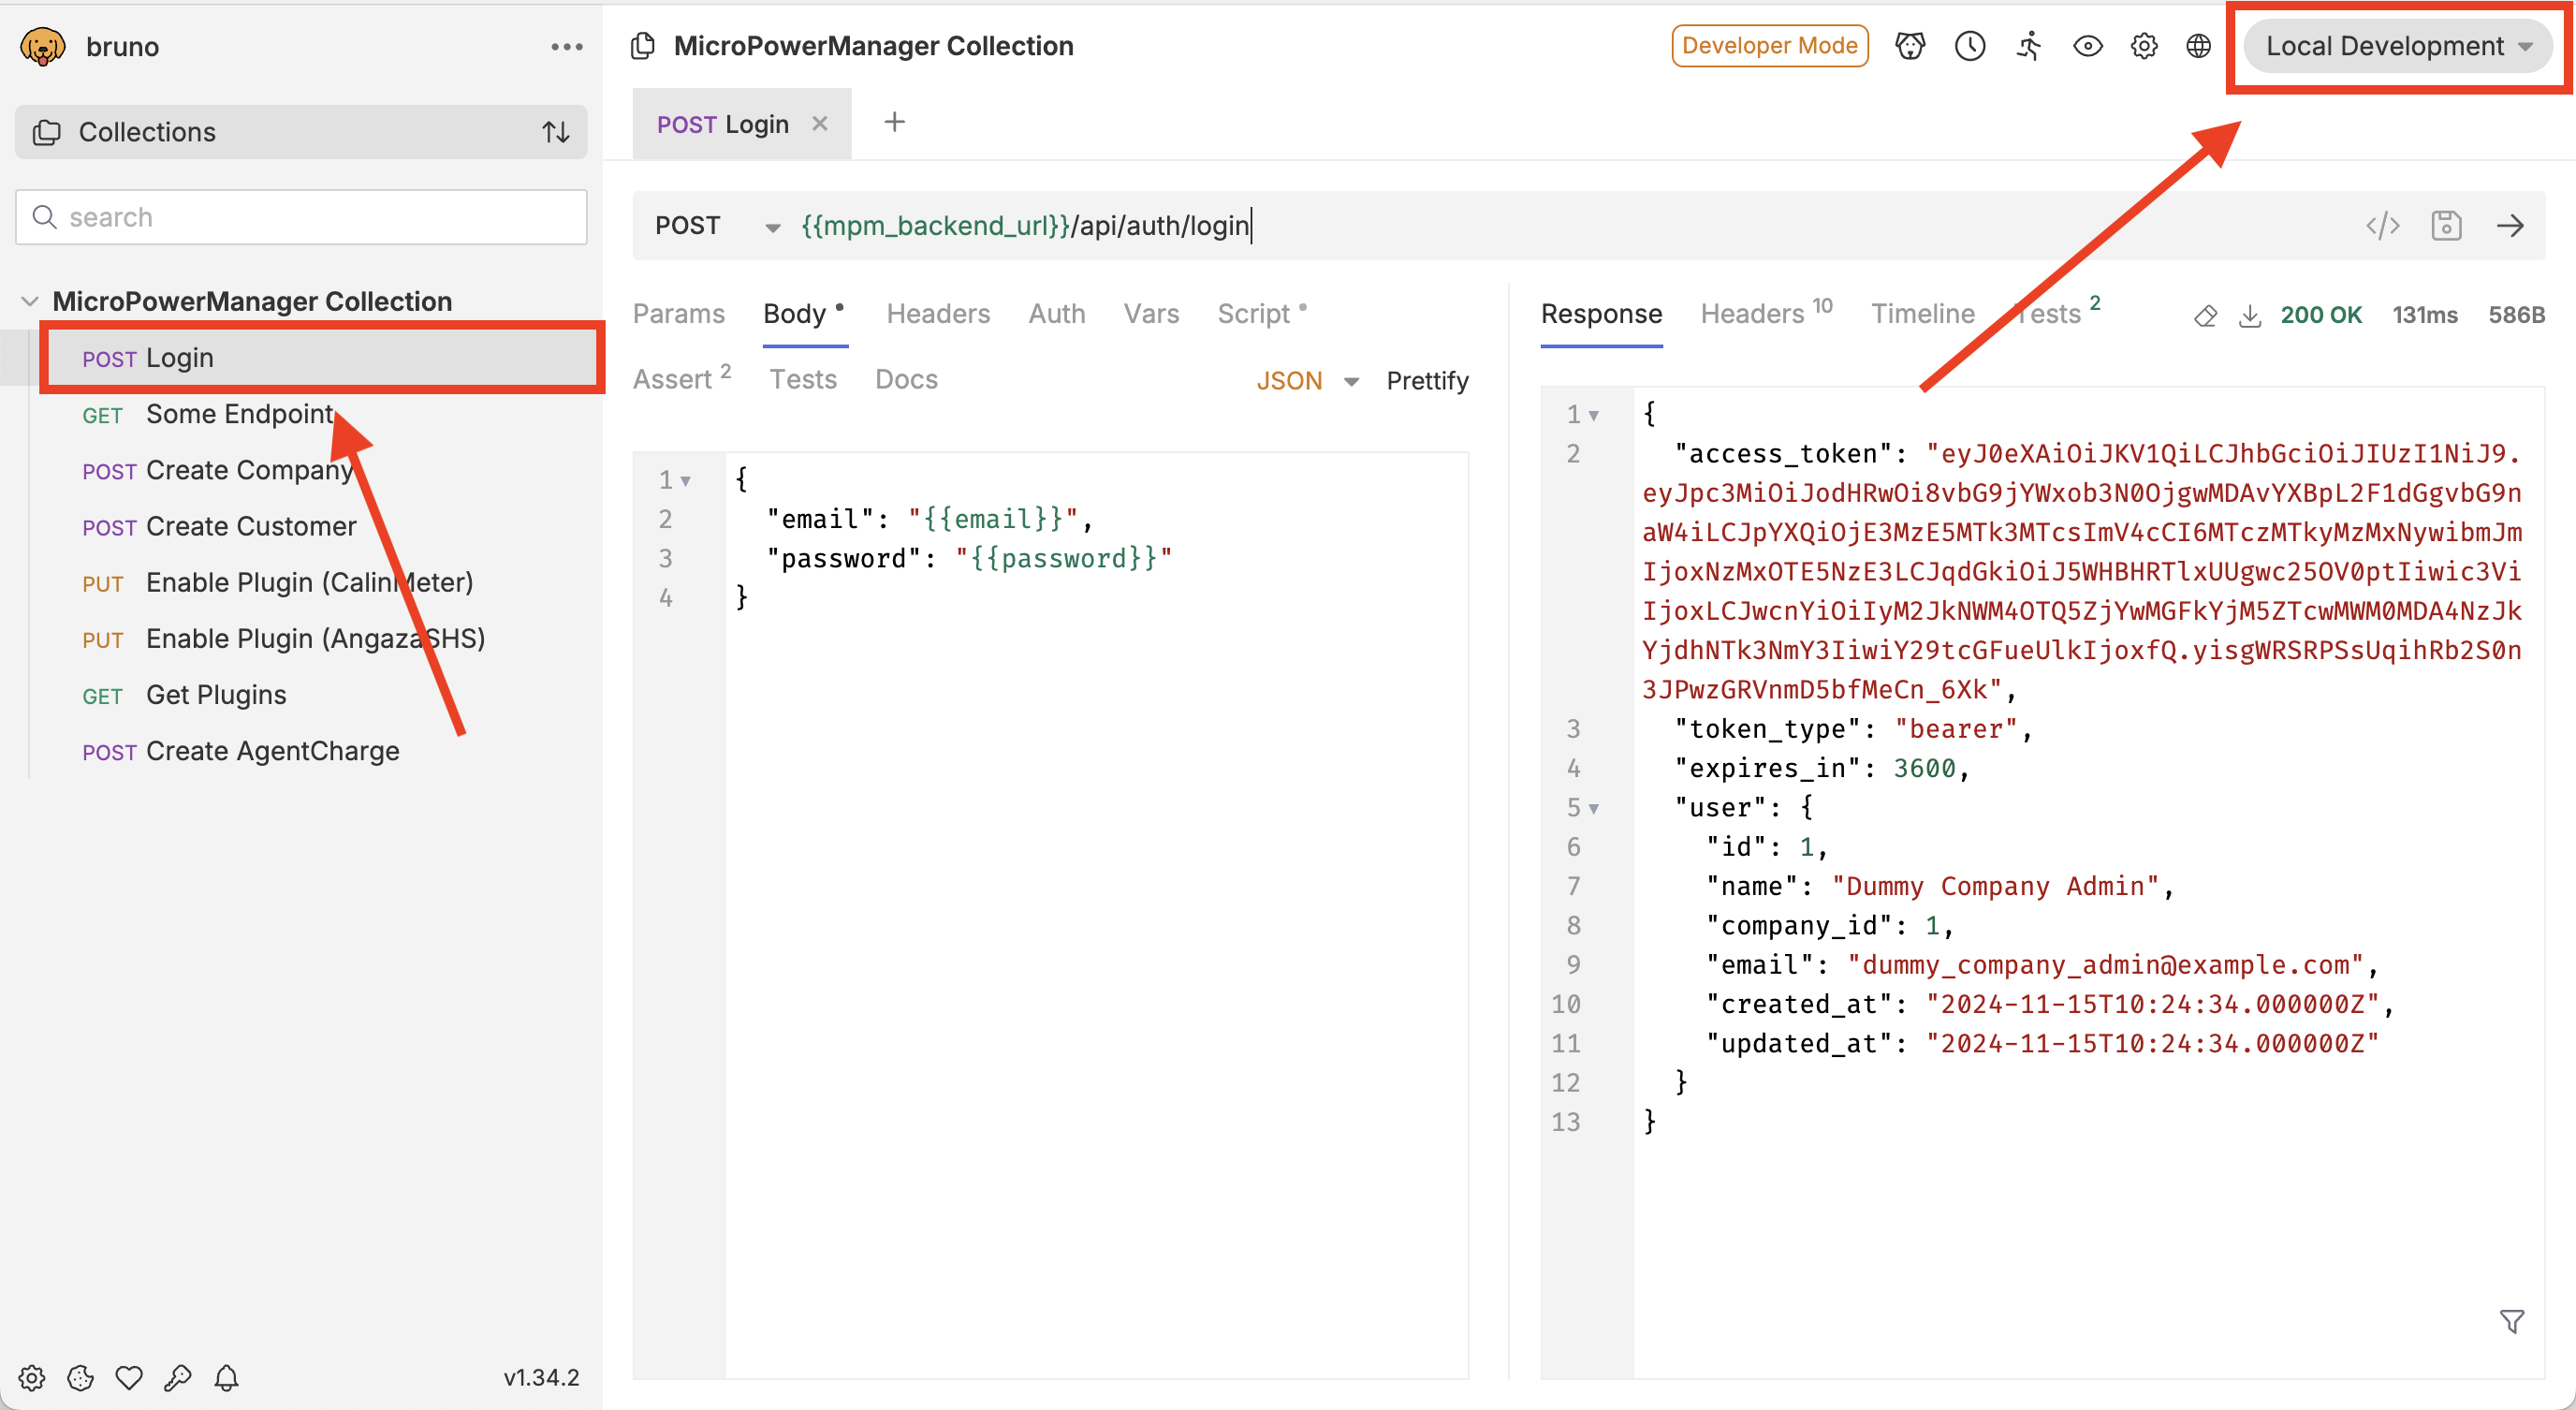
We maintain a handful of API collections to interact with the backend of MPM. You can find the collections in collections folder.
NOTE
Currently, not every API of MPM is covered by a collection. Contributions to increase the coverage are welcome 🙏
- Install Bruno
To interact with APIs that require authorisation
- Select
Local Developmentas environment - Execute the
LoginAPI call

This will save the Authorisation Bearer token into your local variables and use them in consecutive API calls.
SQL editor
When working with the backend part of the code an SQL editor and database manager application can be extremely helpful to visualise and explore the underlying database.
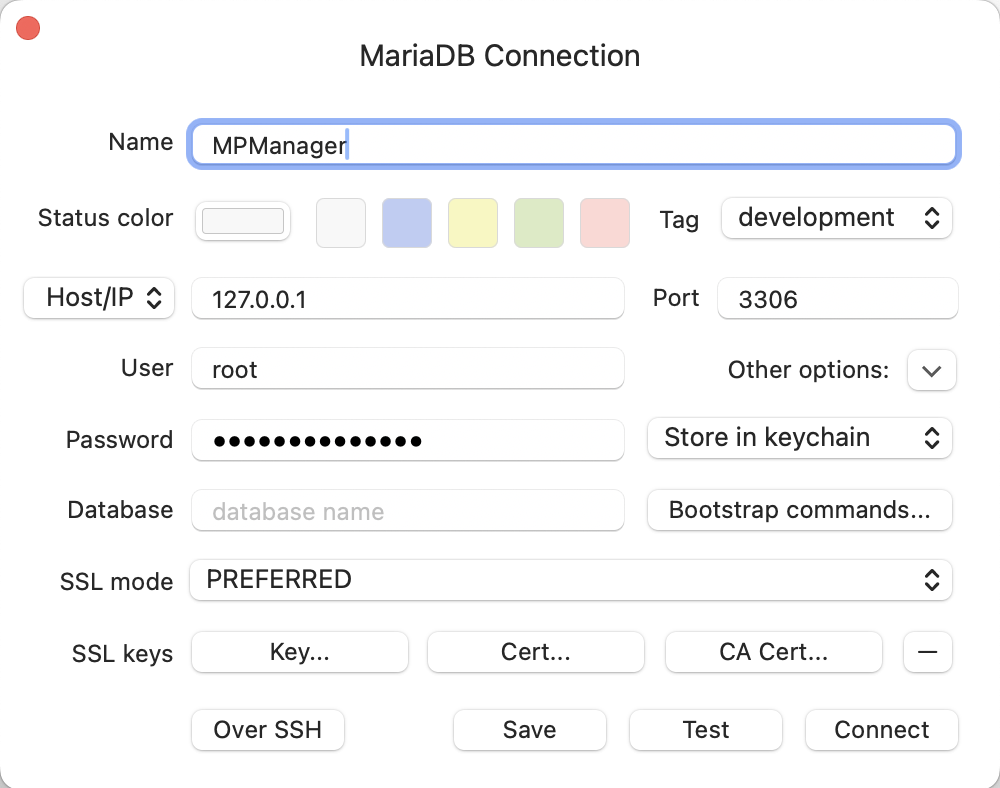
Choose your favorite SQL editor with support for MariaDB (or MySQL). For example
And configure the following database connection
- Database Type: MariaDB (or MySQL)
- Host:
localhost/127.0.0.1 - Port:
3306 - User:
root - Password: Take it from
.env.mysql - Database: Leave empty if possible, as we will be interacting with multiple databases. Alternatively configure a seperate connection for each database. For example
micro_power_managerandDemoCompany_1.

API Gateway with ngrok
When working with external API's that use callbacks and webhook it can be helpful to have a local installation of MicroPowerManager be available through an internet gateway.
- Install ngrok
Usage of ngrok requires an account. The free version usually suffices.
Once ngrok is installed and authentication, open a new terminal an run
ngrok http 8000This will expose your local MicroPowerManager backend via ngrok gateway.
You should see an output like this
Session Status                online
Account                       Developer Name (Plan: Free)
Version                       3.33.0
Region                        Europe (eu)
Web Interface                 http://127.0.0.1:4040
Forwarding                    https://randomly-generated-url.ngrok-free.dev -> http://localhost:8000

Connections                   ttl     opn     rt1     rt5     p50     p90
                              0       0       0.00    0.00    0.00    0.00
Take note of <https://randomly-generated-url.ngrok-free.dev>.
Use a local Frontend with backend server via ngrok
Create (or modify) the following two files at the root directory:
# .env.override.micropowermanager-backend
APP_URL=https://randomly-generated-url.ngrok-free.dev# .env.override.micropowermanager-frontend
MPM_BACKEND_URL=https://randomly-generated-url.ngrok-free.dev
VUE_APP_CUSTOM_HEADERS={"ngrok-skip-browser-warning": true}Expose external API's via ngrok
Create (or modify) the following file at the root directory:
VUE_APP_MPM_BACKEND_URL_EXTERNAL=https://randomly-generated-url.ngrok-free.devVue Developer Tools
For frontend developmenet it can be helpful to use the Vue DevTools.
- Install Vue DevTools in your local browser
Troubleshooting
Port errors
The local development setup uses ports 8000 and 8001. These are quite hardcoded into the application and cannot be changed easily.
Problem: When running docker compose up the output contains errors messages related to ports being unavailable.
Solution:
Free up ports 8000 and 8001 by terminating any applications running on that ports.
Docker build errors
Problem: Certain Docker build errors can be related to interfering volumes that were created in previous runs of MPM.
Solution:
If you encounter Docker build errors, try removing orphaned containers by
docker compose down --volumes --remove-orphans
docker-compose build --no-cache
docker-compose up
Containers get killed at runtime
Problem:
The containers builds fine, but when running them via docker compose up some of the containers get killed randomly without throwing an error.
The logs could contain something like this:
frontend-dev | killedSolution:
Make sure your Docker's Virtual Machine (VM) has enough resources. For example through setting on Docker Desktop.
We recommend the following settings
- CPU: 4 or more
- Memory: 4GB or more
- Disk: 50GB or more
Running test suite locally (backend)
To run the backend tests use the command:
php artisan testNOTE
The test suite is currently being worked up, so expect many failling tests.
